Mastering with Plug-Ins
by Michael Nickolas '84
Experts say you shouldn't master your own music. And that's probably a good rule of thumb if you've been recording a full-length CD for months (or even years), and the CD is slated for mass duplication and release. In that case, you really don't want to master it yourself. If you've been acting as writer, performer, producer, and engineer with your own recording setup, the mastering phase is the time to bring in a fresh set of ears. You need someone who can hear your project anew and form an unbiased opinion.
Nonetheless, I do believe that there are times when mastering your own material is highly recommended and can be accomplished using tools you may already have in your home recording studio. Let's say you are a songwriter recording at home, turning out numerous tunes in different styles, and you want to submit three tracks to a music publisher. I don't recommend that you send out mixes that haven't been mastered. Enhancing your mix gives your songs the edge they need to compete with the hundreds of other submissions a publisher may receive that week. In the mastering phase, you can give your songs the clarity, punch, and loudness that industry folk are accustomed to hearing.
When working on a computer-based digital audio workstation, mastering can be done using audio plug-ins. An audio plug-in is a piece of software that is used in conjunction with or "plugged in" to your host application. In many home studios, the host application is typically a two-track editor or audio sequencing software. For mastering a final mix, I prefer to use a two-track editor. Plug-ins come in different formats such as DirectX, VST, and TDM. The format you use depends on your host application. Most host applications ship with a decent collection of audio plug-ins included, maybe enough to get the mastering job done for you. If not, there is no shortage of plug-in packages on the market to help you master your songs (see the sidebar "Companies Offering Plug-Ins"). The basic chain of tools needed to enhance your mixes are equalization (EQ), compression, stereo imaging, and an audio maximizer. Other tools may be needed for further polishing, but aside from a good set of ears, here are the basics.
|
||
Preparation
First, you need to load your mixes into your sequencer or two-track editor. If your mix is in data format (.wav, .aif, etc.) on your hard drive or on a data CD, simply load it into your software. If you've mixed to DAT, do a digital transfer via AES/EBU or S/PDIF back into your computer. If all you have is an audio CD, I recommend doing a digital transfer from a CD player instead of using software to "rip" it off the CD. I've had an occasional click or pop (perhaps related to the extraction speed selected) introduced into a mix during ripping.

EX.1 A visual representation of a captured noise printed as displayed by a noise-reduction plug-in
Now it's time to make the mix sound better. Begin by cleaning up the file. I listen to my track to see if the song might benefit from some noise-reduction. In many cases, songs recorded on home setups suffer from such noises as high-end hiss introduced by inexpensive gear or a 60-cycle hum introduced by grounding problems. These problems are generally most noticeable during intros, endings, or sections containing quieter passages. The noise is usually masked when all the instruments are playing. It's best not to treat the entire song to avoid introducing any unwanted artifacts and possibly doing more harm than good. I use noise reduction only in the blatantly noisy sections.
When using noise-reduction software, highlight a small section of "noise-only" to teach the software what you want removed from the file. You can usually find noise-only sections at the top of the file, a second or two before the mix begins or at the end of a song. If there is no isolated noise, the noise reduction plug-in may have a few default presets to get you started. After the software has learned the noise print (see example 1, a screenshot of a noise print), apply it to the desired sections. Most likely, you'll be able to tweak many parameters including the number of dB of noise reduction you want. I've found it best to make two passes. For example to achieve a 20 dB drop in noise, make two passes at 10 dB each.
Other undesired noises may include clicks or pops that have somehow worked their way into the file during the recording and mixing processes. Noise-reduction software or your two-track editor may include parameters to eliminate clicks and pops. When you zoom in closely on the click, you will be offered choices for treating the noise. My equipment offers options to "Replace," "Interpolate," or "Copy other channel." You can also try simply muting the sound if it is short in duration.
Some Give and Take with Silence

Ex. 2, Screen shot of DC offset. Note that the waveform display is off center, representing DC offset.
The next step is to remove DC offset from the file. When viewing the waveform display of your song, you'll see peaks extending to both the positive and negative (above and below the center line of the waveform display). The center line represents zero, and the average of your positive and negative peaks should equal zero. It is possible, however, for the positive or negative peaks to be shifted in either direction. This is viewable by zooming in on a silent section and seeing the straight line that is not exactly on center (see example 2). You want to center your waveform on zero by removing the DC offset before applying any of your mastering plug-ins. This avoids introducing any distortion or unwanted artifacts during file processing. Most editors have the capability to remove DC offset. If not, free plug-ins are available on the internet to accomplish this.
In preparing files, my final step is to make any neccessary edits. If I have to shorten the song by cutting, or extend it by repeating sections, I do so at this stage.
Processing
There are no hard-and-fast rules about processing your file for optimal sound, but here are some guidelines to get you started. First, know your tools and take the time to practice with them just as you would practice your instrument. Anticipating how the settings of a plug-in affect audio will make things easier when it comes time to use the plug-in.
The first step in processing is to convert a file that is in the 16-bit format to 24 bit. Since the CD standard is 16 bit, we will need to get the file back down to 16 bit eventually, but you can get better sound quality by applying your enhancements to a 24-bit file. Most audio editors easily convert between bit formats.
Reference Point
The next step is to load in a reference song or two. Locate a commercially released CD that is similar in sound and style to your song. For comparison, pick a few tracks to extract into your software. Now's the time to put your ears to work. The goal is to get your music to sound as similar as possible to the commercial CD. Listen for a while and then switch to your song. Your song is bound to be at a softer volume. You need to listen to both songs at the same level. When you switch between your song and the examples, turn up the external monitoring volume and then turn it down again when switching back to the commercial example. You might notice that your song sounds pretty good once you've matched its volume to that of the reference piece. Run the file through an audio maximizing plug-in to get the overall volume up.
No doubt, you'll hear that something is missing from your song. Go back to the basic chain of plug-ins for EQ, compression, stereo imaging, and audio maximizer. If you own individual plug-ins, you can most likely chain them together in your host application. Some plug-ins, such as iZotope's Ozone software, bundle the typical mastering plug-ins together in one suite (see example 3).

Ex. 3 iZotope's Ozone software chains six effects into a single plug-in.
Start with the EQ. Compare the commercial song with yours to identify what is lacking and determine whether it can be fixed with EQ. Maybe you can get the sizzle that's missing by tweaking the high end or add the bass that is lacking by increasing the lows. Maybe you can add clarity by removing muddiness by dropping frequencies around the 300 Hz range. Perhaps the vocal will stand out more if you bump up the high mids. Experiment with the different EQ filter types (parametric, low pass, high pass, low shelf, and high shelf). Your EQ might offer a "Q" setting that can help you work with exact frequencies. Don't forget to bypass the EQ occasionally and listen to the original file, and keep checking your reference tunes. This helps ensure that you are actually improving rather than degrading your mix. Of course it's possible that a professional mastering engineer wouldn't always use EQ in the above circumstances, but this article is a guide for doing it yourself. The goal is to improve your mixes simply with the tools at hand before sending them out to your contacts.
Next in my basic chain is compression. Consider using mastering compression if you would like to add some punch, definition, and, in some cases, warmth to the mix. Once again, there are no standard settings, everything depends on the source signal, musical style, and so forth. If your compressor plug-in includes presets, you could use one of them as a starting point. If you don't have presets, try a 1.50:1 ratio at -12 dB with a fast attack time and a release time of around 100 ms. Tweak this until it sounds good and you are achieving 2 dB or so of gain reduction. Concentrate on the attack setting if you want more or less punch. Most compressors will have a makeup gain setting, and/or a volume output fader. Use them to get the overall volume of the song up while remaining below clipping level. For the warmth factor, many compressor plug-ins have an "analog simulation" or "warm" button you can use. Enable it and see if it has a desirable effect on your song.
The compressor is followed by a stereo-imaging plug-in. A stereo-imaging plug-in can widen and add space to a mix. For me, this is not a must-use plug-in. Some brands of stereo-imaging plug-ins can introduce a loss of bass (because it has been moved away from the center). I generally enable the imager and listen. If the song sounds much better, I go for it. Obviously if it negatively affects the mix, or if there is no discernable difference, I bypass it.
Now it's time to hit the limiter or "maximizer" plug-in. This is where you bring the volume of your mix up without overloading the output. The loudness maximizer plug-in will probably make the most audible difference of all these processes. It usually sports a simple interface such as the Wave Arts FinalPlug (see example 4). Basically, you set the out ceiling below clipping, at, say -0.3 dB. As you lower the threshold, the music gets louder without clipping. Be forewarned, however, that you are squashing the dynamic range of your song, which could suck the life out of it. If you try to make it too loud, the sound will get ugly. It may not be clipping, but a certain nastiness will creep in. A symptom of this problem is usually first noticeable as a graininess in the bass. Resist the temptation to make your mix louder than the next person's. Give it a nice bump in volume so the people you are sending it to won't perceive it as weak sounding (and have to reach for the volume knob), but don't overdo it. You probably won't get it as loud as your commercial example; the pros use a very different tool set. Finally, if after maximizing you notice the low end is standing out a lot more, don't hesitate to go back to the EQ to compensate.
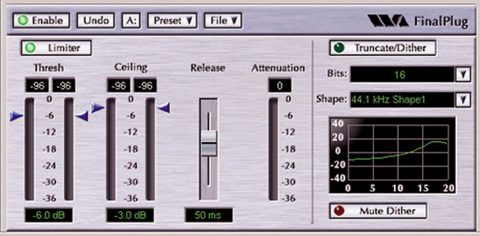
Ex. 4 Screen shot of Wave Art's FinalPlug maximizer
Solving Problems
Sometimes even after using the basic chain to the best of your ability, the song may still lack something and just not sound close to your reference track. You may need to try other tools such as an aural exciter, a multi-band compressor, or even a reverb.
I'll break out an aural-exciter or enhancer as a last resort when the mix is very dull sounding and nothing in the basic chain is bringing it to life. An exciter can add sparkle to your mix. It may sound so good you want to add it to everything, but don't. In my opinion, overusing these devices tends to fatigue a listener. I save them for solving problems.
Multiband compression is another great problem solver (some would say it should be in the basic chain of tools, but again, I'm trying to keep it simple). This is also one of the hardest processors to learn and use. It is similar to regular compression, but it only affects the specific bands you choose rather than the entire frequency spectrum. I tend to use one when EQ isn't doing the trick. For example, if I just can't get the low end where I want it using EQ, I call up my multiband compressor, choose the bass enhancing preset and start tweaking the frequency, threshold, ratio, gain makeup, and other parameters. The same can be done for the highs. It can also be used to tame a frequency that is jumping out of your mix. If the snare is too loud, for example, you could use a multiband to compress and bring down its frequency. The snare and the vocals typically live in the same frequency range though, so fixing the snare may adversely effect the vocal. Putting in some hours learning a multiband compressor can pay off down the line.
Finally, sometimes a touch of reverb on the entire mix can be an appropriate solution to a sonic problem. Don't smother your mix in reverb, but a little bit of room ambience may be just the right solution. Use your ears and your reference CDs to judge just how much to use.

Michael Nickolas is a guitarist and composer whose music has been used on Jag (CBS) and Soul Food (Showtime). Visit www.studionineproductions.com or e-mail him at michael@studionineproductions.com
The Last Step
To finish, you need to bring your mix back down to 16-bit format to burn it to an audio CD through the process called dithering. If you were to convert it back to 16 bit without dithering, you would simply be truncating the lowest eight bits and introducing quantization errors. Dithering corrects for these errors before converting from 24 to 16 bit, allowing the song to retain the sound quality you've been hearing all along. Your maximizer plug-in most likely does the dithering, though the file itself remains at 24 bit after processing. When you save it from your audio editor, do so in 16-bit format without applying any further dither. After the maximizing and dithering steps, you're done. Nothing further should be done to the file other than burning it to audio CD. If you need to make changes go back to your original unmastered file, call up the plug-ins and presets you've saved, tweak and reprocess.
It will take time to master the techniques of mastering, but it took time to master your instrument and recording software, and to hone your songwriting skills. Spend the time necessary to learn about mastering and give your songs the edge they need to stand out with music publishers.